shopping cart</a>"
data-nopNotificationWishlistResource="The product has been added to your <a href=https://www.dultmeier.com/blog/"/wishlist">wishlist"
data-enableOnProductPage="True"
data-enableOnCatalogPages="True"
data-miniShoppingCartQuatityFormattingResource="({0})"
data-miniWishlistQuatityFormattingResource="({0})"
data-addToWishlistButtonSelector=".add-to-wishlist-button">
As we continue to grow in the petroleum/fuels industry we want to highlight a long-standing and well-respected partner in Husky. We use many Husky nozzles in our own manufactured products such as our diesel transfer units. Quality, assurance, and dedication are all fantastic descriptors of this wonderful company.
Husky has been serving the petroleum industry for over 70 years. Husky has hung its hat on developing ground-breaking products such as American-made fuel nozzles, hoses, safe-t-breaks and accessories, and oil/lube products. Extremely dependable customer service not only supports, but compliments the Husky brand. The company headquarters is in Pacific, Missouri which is in the surrounding St. Louis area.
Safety, Quality, Customer Loyalty, Team Building, and Productivity are the five pillars which Husky focuses on daily to ensure that the Husky brand exceeds expectations. A constant recognition of the past helps keep this proven industry leader at the top.
Shortly after World War II, Eugene Sutcliffe designed the first gas guard in his home. The design originated to protect car exteriors from scratches when fueling. Soon after this new product began to gain momentum Sutcliffe was designing fuel nozzles that would revolutionize the petroleum industry.
Sutcliffe traveled from gas station to gas station, across the country, selling his products out of the back of his car. He was always accompanied by his dog - a husky. He made it a point to bring his companion along on sales calls to portray the message of dependability, intelligence, and steadfast trustworthiness. This is the unique story of how the brand logo, and company name, came to be.
Roughly 70 years later Eugene's son, Grenville, heads the company and continues the tradition that was long ago started by his father. A tradition that embodies the admirable characteristics of a canine companion - dependability, loyalty, endurance, and trust. Here is Grenville explaining one of Husky's American-made nozzles.
Raven was founded in Sioux Falls, SD in 1956. The company originated as a designer and manufacturer of high-altitude research balloons to solve challenges related to space exploration. From that single product line, they have evolved into an extremely diversified technology company.
Raven Applied Technology
Raven Applied Technology was created in 1978 and has helped to create, define, and redefine precision agriculture practices and technology. In today's agriculture industry when the topic of precision agronomy comes up - there is no doubt that Raven Industries will be discussed, as well. The two go hand-in-hand. From field computers, application controls, guidance/steering/wireless connectivity, and cloud-based data management, Raven is at the cutting edge of some fascinating technology.
This innovator offers tremendous resources to the industry, as well. For instance, take their technical support website Ravenprecision and recognize the amount of information that is available at your fingertips. From locating dealers, product support, to groundbreaking news you will find it all here.
Drones
Raven Applied Technology announced a partnership with AgEagle Aerial Systems early this year. AgEagle Aerial Systems is a leading provider of unmanned aerial systems technology that is used in precision agronomy. Drones are becoming more of the farming community and faster than one would think. Raven has aligned themselves as the exclusive distributor for AgEagle and their RX60 fixed-wing UAV.
During flight, the RX60 captures aerial images of the field and can identify crop health in each and every field it passes over. This is accomplished through special camera lenses and software that can correlate crop pigmentation into plant health. For instance, one measure of plant health is the amount of green pigmentation that is present in the plant.
If the plant has more of a yellowish hue this identifies with nitrogen leach or nitrogen deficiency. A farmer can easily see this when crops are smaller. However, when crops get above shoulder height it is extremely difficult to monitor this - that's where UAVs come into the picture.
Many people in the agriculture industry recognize the actionable data that drones can provide. For this reason, many people understand that drones will continue to impact the agriculture industry and Raven feels that they are aligning themselves in a great position to re-solidify their position as a cutting edge technology provider.
Have you been pondering the idea of starting a car wash? Does the idea of passive income sound appealing? That's because it is. Do know that there is an extensive amount of upfront work and then there is the issue of ongoing maintenance. That being said, once you have an operational car wash up and running - you can consider it passive income.
Everything You Need to Know About Starting a Car Wash Business
The information below is a compilation of countless periodicals, customer surveys, and testimonials. At any point in the process of your new adventure, should you feel the need to ask about something in more detail don't ever hesitate to contact us. Let's dig into what you will need to do in order to properly align yourself to start a car wash.
Car Wash Lot Selection
A general rule to follow when sizing lot is that you will need a lot approximately 100 - 120 feet deep by a minimum of 75 feet wide - depending on the number of bays. Keep in mind a typical four bay self-serve car wash would need a lot 120 feet long by 100 feet wide - minimum. Another key attribute when selecting the ideal lot for your car wash is that it is accessible from both directions of traffic flow.
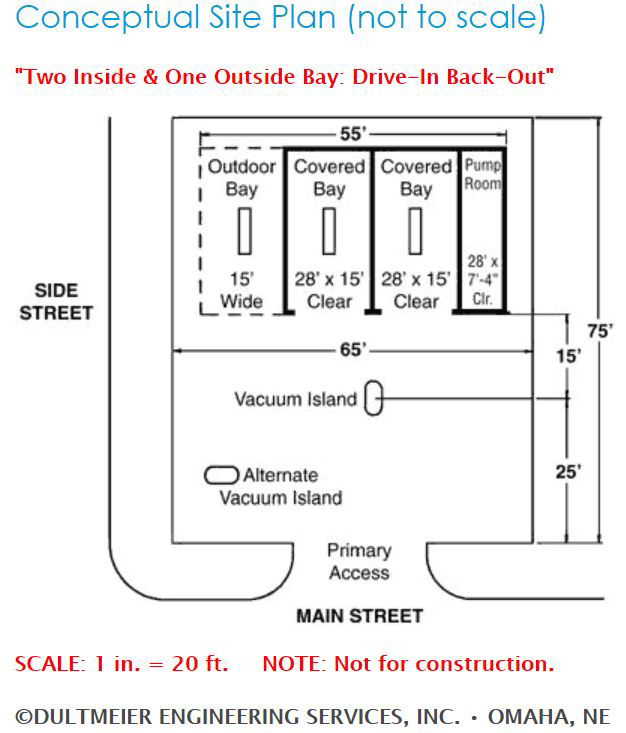
For instance, if you select a lot that is on a one-way street it will negatively affect the volume your wash is capable of producing. The ideal traffic speed in the area of your lot selection should be around 40 miles per hour. This ensures that drivers have ample time to select your wash as their destination. The lot size and shape will determine if you design a "drive-in-back-out" or "drive-through" building.
Data shows that income streams do favor the "drive-through" design. Lastly, when selecting your ideal location it is a good idea to target areas near residential neighborhoods, apartment complexes, or busy traffic routes. When determining if your ideal lot selection is a good fit for your business plan, you should consider the finances, as well.
A safe rule to adhere to is that the cost of the property (monthly lease payment) should not exceed 15 - 20% of the gross monthly income of the wash. This ensures that you will not over-extend yourself, financially.
Bay & Building Sizing
An ideal bay is 16 feet wide by 28 feet long - these are the interior wall measurements. If you are planning a semi-truck bay make sure to account for internal wall measurements of 18 feet wide by 28 feet long. You can make a smaller bay work for trucks but why not just do it right from the start? The typical pump (equipment) room is 10 - 15 feet wide by 28 feet long (internal measurements).
Furthermore, the typical bay height is 10 feet high for cars and 12 - 14 feet high for semi-trucks. Your lot size above will vary depending on what your overall wash purpose is (car vs. semi-truck) and the number of bays you intend to have. That's why we recommend determining the bay purpose and number of bays at the same time you are selecting your ideal lot location.
Building Placement
It's always best practice to consult local regulatory agencies to ensure your building is within code. That being said, your building should be situated on the lot to allow for one to two cars, minimum, to be parked behind each bay, waiting to wash. Vacuums should be placed in this area, as well, but should not be an impediment to the normal traffic flow into the bays. Another important concept to consider is that you ensure there are adequate drying and vacuuming areas.
These areas should be out of the main traffic flow to avoid congestion. It is a good idea to allow for a southern exposure of your bays. This helps to reduce ice build-up in colder weather climates. Finally, make sure you plan for the "set-back" requirements on your building placement - this will vary with local ordinances.
Inside vs. Outside Bays
This aspect really does depend upon your market. Therefore, drive around and study the target market for the area which you have selected. That will give you a good idea of whether or not you need to have an outside bay or an inside bay. Washed located in a rural setting can be built with an open outside bay to accommodate trucks, trailers, and tractors. While this isn't required it can, and will, only allow for more traffic at your wash.
Do keep in mind that an outside bay will bring in 50-60% of the revenue that an inside bay will. It is always better, from strictly a revenue standpoint, to enclose all bays and build one larger bay for semi-trucks - if you feel that your market will demand that. This larger bay can always be used for car traffic when an overflow bay is needed.
Starting a Car Wash: Earnings & Costs
Planning the financials for a self-serve car wash is essential for ensuring long-term profitability. Whether you’re considering opening a new location or optimizing an existing one, understanding projected revenue streams, costs, and features can help you make more informed business decisions.
Revenue Projections
Our experience tells us that it takes a population of about 1000-1500 people to support a single self-serve bay car wash. Therefore, one can conclude that a town of 5000 people will support a total of 5 self-serve bays - between ALL competitors. Given the current population level of the United States, the national average one can project roughly $2000/bay per month during peak traffic season(s). This is an estimated average - revenue can and will vary.
The ideal number of vacuums to have is 1.5 vacuums per bay of service. Therefore, a three-bay wash should have four to five vacuums in an area of the lot that will not affect traffic flow. The national average per vacuum is approximately $200/vacuum per month. Again, revenue can and will vary.
National averages of vending revenue are generally around the $400 per month range. This figure is based on offering at least four to five different vending products. Do keep in mind that revenue can be increased with multiple-product clear front vending machines.
Operating Cost Projections
One can expect that average operating costs are approximately 50% of gross revenue. This figure includes 13% for attendant labor, which may or may not be needed. Do note that lease payments, income tax, debt reduction or depreciation are not factored into this number. Furthermore, we must be clear that one should recognize these figures can and do vary from region to region.
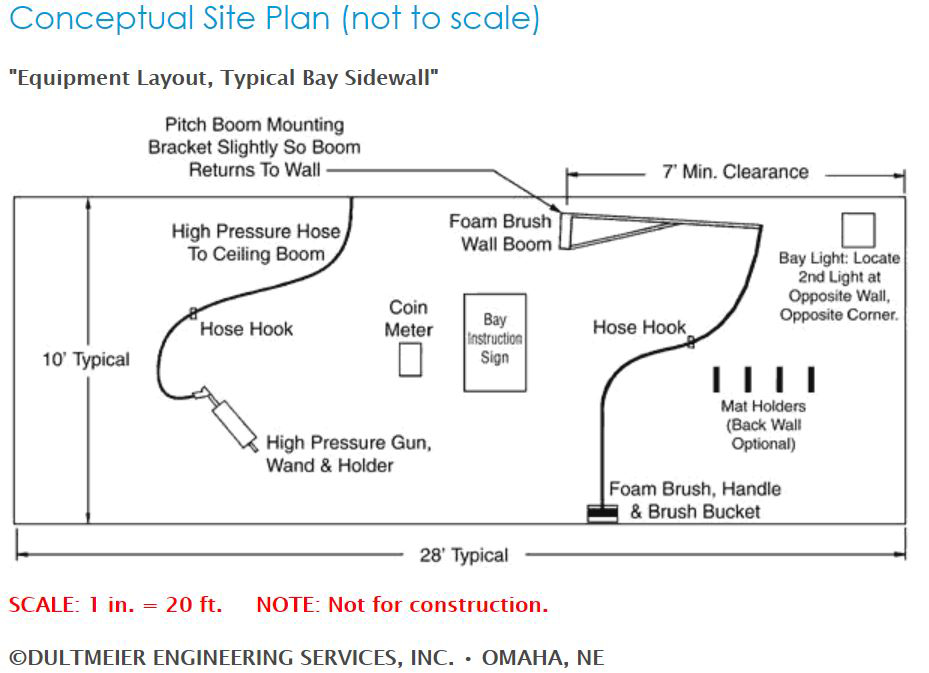
Options & Features
A standard self-serve wash will offer hot wash/hot rinse in the winter and cold rinse in the summer. Additionally, hot or cold wax, foamy brush and spot-free rinse should be considered. Spot-Free rinse is an important feature. It increases revenue due to the fact that customers need to "buy" another cycle of time to get this feature. What does this mean? Double the income from each customer that decides to use this feature. Tire cleaner and pre-soak systems are also options that increase customer satisfaction and increase revenue.
We highly recommend that instantaneous tankless water heaters be used in place of conventional water heaters. An instantaneous heater can reduce gas consumption by up to 40% in comparison to a conventional heater. For example, if it rains for an entire week, only the pilot light is using gas in the instantaneous tankless system. If only the pilot light is running that takes considerably less fuel, and therefore, less money - directly affecting your bottom line - in a positive way.
Conversely, the conventional water heater will continue to heat the water regardless of demand. Think of it this way - the instantaneous heater only fires when water is needed, thus making the system much more efficient. Another important feature to consider is floor heat.
Every cold climate wash should have a floor heat system. Floor heat systems reduce liability and increase customer satisfaction. An in-floor circulating system is the most popular design. That being said, above-head radiant tube heaters also give the benefit of heating the floor as well as the customer. Keeping your customers warm while they are in your bays will keep them happy and ensure they continue to come back as a repeat customer.
It is wise to account for heating a three to four-foot area on the entrance and exit aprons of each wash bay. This will reduce customer liability in the walk areas as they use bill changers and vending machines. Ice will build up in colder climates and you want to ensure you do all within your power to mitigate injuries on your property.
Another important topic to address is the use of proper signage. It is frustrating to use a wash that is poorly explained due to the lack of proper signage. Yes, many people will be able to figure it out. But, why let this be part of your customers' experience? Don't you want them to get exactly what they want out of your wash? Get in, get out, and have a clean and sleek finish. Here are some examples of car wash signs we offer.
Additional Revenue Streams
Do not overlook vending products such as towels, Armorall, window cleaner and fragrance trees. These are additional revenue streams. Piggybacking off vending machines, every wash should have bill changers. This is an absolute necessity. Studies have shown a minimum 10% increase in gross revenues for washes that have bill changers.
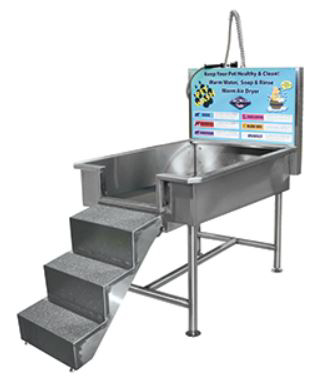
Another trending area that has taken off in the past few years is the addition of pet washes at car wash facilities. The demand is there and many people will wash their cars and pets in the same visit. This has been a profitable investment for our customers who have installed pet wash facilities at their locations. You can view some options here. As always, should you have more questions than can be answered by our website don't hesitate to contact us.
With the big shift in application products and techniques taking place in 2017, many of the foundational principles still remain in 2021. The biggest principle is to ensure that you "stay on label" when applying Dicamba products. Strict adherence to label instructions will help reduce liability greatly. We know that wind and humidity are major factors when selecting application day(s) and time(s). Now that the country has a few solid seasons of good spraying data, we can look back and use the data to help us continue to progress forward and improve applications.
One major change to the market place since this blog was posted back in October of 2017 is the Bayer-Monsanto merger. This merger has brought together two titans in the ag-chemical world and has further consolidated the marketplace. In the write up below there is some good information regarding application and snapshot in time of where we started out when not much was yet known with these products.
One thing is for certain - Dicamba is here to stay and we, as an industry, need to continue to stress the importance of training and proper application techniques. Firsthand experience tells us that these products, when applied correctly, smoke RoundUp Ready resistant weeds. Our farm on the Nebraska/Kansas border has much cleaner fields after having made the switch two seasons ago. But, Mother Nature always finds a way to survive....That begs the question - how long before we start to see Dicamba-resistant weeds?
Update 10/10/2024: Court rulings in 2024 have led to changes in what products are allowed. You can learn more here.
Dicamba Leading up to 2017 and In-Season 2017
Herbicide-resistant weeds have been expanding across the country for the better part of the past decade. Crop protection product companies such as Monsanto and Dow Chemical along with seed companies such as Syngenta have come up with multiple options to help combat these pestering weeds. The most promising solution appears to be within the Dicamba-resistant strains that were first made available for the 2017 season. Even before these seeds began appearing in fields in early 2017 there was a significant amount of skepticism.
Many people shared the sentiment that Dr. Kevin Bradley expressed at the Wisconsin Crop Production Association annual meeting in January 2017. Dr. Bradley stated, "There is no question the Dicamba option is coming, there's no question about it. But it's another question altogether whether we can steward this technology, and time will tell if that's true or not." He also pointed out the volatility of Dicamba and how finite amounts of this product could damage crops.
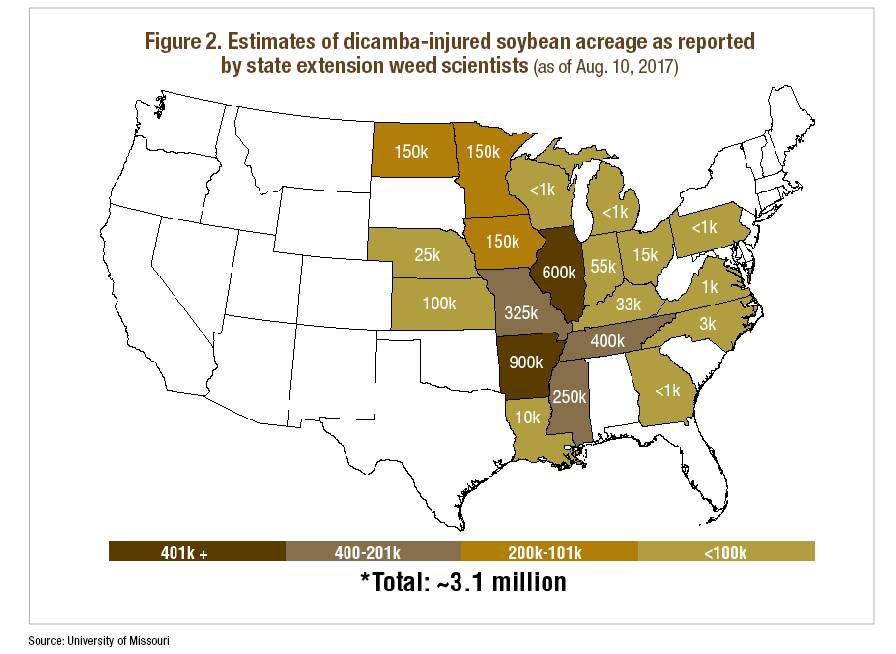
By the middle of 2017 states such as Missouri, Arkansas, and Tennessee had already received multiple complaints from growers of suspected Dicamba damage. It is estimated that more than 3.1 million U.S. acres have suffered from Dicamba-related crop damage (Crop Life: Special Report Managing Weed Resistance). Arkansas is actually on the verge of banning the application of Dicamba products - completely.
Even if it doesn't get banned it has been voiced that application restrictions will make it virtually impossible to actually apply the product. For example, if you can only spray the product with winds between 3-10 mph you don't have much of a window in the Midwest. We don't have too many days during spray season with winds between 3-10 mph. By the time you're able to actually spray (within regulations), it's too late because the weed plant is too far along to actually kill. This scenario is speculation, but is certainly a real possibility.
The Wall Street Journal reported that Monsanto actually sued the Arkansas State Plant Board in October. This came after the board's decision to ban Monsanto's new herbicide. Monsanto claims its herbicide is being held to an unfair standard. Arkansas has been the focal point of complaints with almost 900,000 acres of crop damage reported. It is noted that farmers in 25 states have submitted more than 2,700 claims to state agricultural agencies. The complaints share the common theme of neighbors' Dicamba spray drift and account for 3.6 million acres of total reported crop damage.
Dultmeier Insight from In-Field Observations
Our traveling sales representatives found evidence of Dicamba-related damage in a widespread area of our travels. The conventional beans that were affected appeared to be "cupped". The plants didn't canopy until later in the season - much later than normal. We will start to know how much of an impact this chemical had on yields as the combines get in the fields and begin to report yields. Some actually thought it could have a positive impact on yields since 2,4-D is a growth killer.
Some of the Dicamba products are derived from the chemical 2,4-D which basically grows a plant to death by oversupplying it with hormones. The thought process behind this theory is that if the plant pulls through the "cupping" stage and comes out of it, the farmer could actually see a yield bump. Again, that theory is yet to be proven...Below is an image of soybeans cupping due to Dicamba damage.
Even though many conventional fields were harmed there were much cleaner soybean fields this summer versus 2016 - at least in the areas we traveled. The conclusion being, it worked - for those fields that were Dicamba-resistant seeds. But we did see a number of conventional fields that looked awful. They looked awful from the perspective that the soybean plants were small and sickly looking. That being said - weeds were not present - so you can make the argument that the Dicamba did kill the weeds.
Drift is a major topic when the phrase "Dicamba" is brought up. We even had one customer in the Polk, NE area that mentioned they witnessed product from an applied field actually lift up and move to an adjacent field a week after it had been applied - an entire week later! You can ask the chemical companies and they will say that's not possible. The proof is in the pudding, folks - there are many instances similar to this over the past year. If we have learned any lesson, it's that these Dicamba products are extremely volatile and we must continue to educate, educate, educate.
Training and How Crucial It Is
There is a simple and basic rule to follow: The Label is the Law. If you are applying a product with a spray tip that is not on the label and you damage a neighbor's crops - you're liable. If you are running a spray tip that is on-label, but operating out of the required pressure range or spraying in too heavy of wind and damages a neighbor's crop - you're liable. The days of using one tip for every chemical applied are long gone. An applicator must be 100% certain they are operating within parameters specified on the product label.
Always consult your label if you have questions about what application products or techniques you should be using. For instance, a common theme is wind speed. Labels limit wind speeds between 3-10 mph on many of the Dicamba products.
It has been mentioned that during periods of high temperatures and high humidity vapor drift can readily be witnessed up to three days after application. Recall our example from Polk, NE and know that vapor drift from inversion has been documented outside that three-day window. What is inversion? Inversion takes place generally from 3 pm to 8 am the following day.
Generally, air near the ground is warmer while the air higher up away from the earth's surface is cooler. When an inversion takes place the opposite happens. Colder air is closer to the earth's surface and the warmer air is higher up - away from the earth's surface. This phenomenon can commonly be seen in the fall around harvest time - when soybeans are cut and the dust hangs in the air it can be reasonably assumed that an inversion is taking place. Tiny spray droplets will "hang" in the colder air and can float around on slight breezes.
Driftable fines of these Dicamba-based products have been found to drift miles from the application site. Due to this fact, the spray tips that are approved are those that create a larger and coarser droplet through air induction. Such as Teejet's Turbo Teejet Induction Nozzle.
There is a wide selection of approved tips from various manufacturers such as Wilger, Hypro, Teejet, and Greenleaf. Remember, always consult your specific product label to ensure the tips you are choosing from are actually approved - you need to be on-label to safely and responsibly apply these products. Furthermore, you can visit these chemical websites as additional resources: BASF - Engenia & Monsanto - XtendiMax.
Update 10/10/2024: Court rulings in 2024 have led to changes in what products are allowed. You can learn more here.
As of mid-October 2017, Monsanto has voluntarily proposed to offer further educational programs to ensure farmers have success with the Roundup Ready Xtend Crop System for the 2018 season. These updates include mandatory training, new recordkeeping requirements, and a Restricted Use Pesticide (RUP) designation. This will limit the sale and use to certified applicators or those acting under their supervision. All of these steps are supported by the Environmental Protection Agency (EPA). The new recordkeeping requirements will better track label compliance and help protect farmers using the Xtendimax system - as long as they follow the product accordingly - adhering to all label instructions.
Equipment Rinsing & Maintenance
Thorough clean-out is a must for any equipment used in Dicamba application. Applicators must keep the sprayer completely clean after Dicamba applications. Due to the volatility of the product if there is any residual left in the plumbing system of a sprayer it will be applied at the next application site and drift from there. Triple rinse with fresh water has become the industry standard. Check out this other blog post for rinse-out techniques and tips.
This triple rinse process includes the entire plumbing system - strainers, screens, dead spots in the booms, nozzles, valves, pumps, etc. Hypro has designed their Express Boom End Cap to aid in flushing booms. Similarly, Wilger has come up with their own design to fit CASE IH Patriot sprayers. Both of these products help eliminate dead space in the boom where residual chemical builds up and can cause headaches - major headaches when dealing with Dicamba products.
Furthermore, we have had a small handful of customers actually install chemical weighing systems solely for the dispensing and selling of Dicamba-products. This keeps the product completely and totally isolated from any others in their inventory to avoid contamination.
Moving Forward and What that Means for Dicamba
So what does all of this mean for the future of Dicamba-products and how widely used they will or will not become in the near future? One side can make the case that due to the number of claims and issues that were found this past season, more farmers will plant the Dicamba-resistant seeds in 2018 as nothing more than an insurance policy. After all, we did hear, in a number of instances, that growers actually planted the Dicamba-resistant seeds in 2017 solely as an insurance policy. They knew their neighbors would be spraying Dicamba and chose to use this method as an insurance policy.
The other side could argue that due to the widespread damage created by the conventional seed vs. Dicamba-resistant seed issues this past year we might not have any Dicamba-resistant seeds available for 2018 planting. Arkansas is leading the regulation wave here. They are about one step away from banning Dicamba-based products altogether, at the time of this writing. There are a handful of other states that are leaning in this same direction. However, there are times when the market will actually overtake regulation. Demand is a powerful force and we could see that process take effect very soon.
In my travels as a territory sales representative over the past four years, I have seen glyphosate-resistant weeds migrating north from central Kansas to central Nebraska - over 300 miles. Each year the soybean fields get dirtier and dirtier - and the number of dirty fields has been increasing - at an alarming pace. 2017 was the first year I actually noticed a number of fields that were "clean".
Weeds raise hell not only on crops, but on equipment as well. Some fields have gotten so bad that one cannot run a combine through them. They were just cut for silage. We heard of many instances where growers spent twice their normal budgeted amount on combating/controlling weeds in 2017.
When it gets to the point where you spray a field five times (I heard this nightmare more than once) and still cannot get a kill on the weeds - you need to do something different. A wise old man by the name of Albert Einstein once said, "Doing something over and over while expecting different results is the definition of insanity."
"The vast majority of farmers using our low-volatility Dicamba product have had tremendous success in 2017, both with on-target applications and good weed control," says Ty Vaughn, Monsanto's Global Regulatory Lead. "The product was extensively tested for volatility and other forms of off-target movement before it was made available to farmers this season. We are confident XtendiMax can continue to be used successfully in the System next season."
Mother Nature is forcing our hand and we need to adopt alternative methods to combat weeds. Say that Dicamba-based products are outlawed. It doesn't mean it will keep growers and producers in this country from finding a way to improve their yields and solve this weed issue. The market creates the demand and demand is a powerful force.
Evidence of Susceptible Crops Nearby (Date that this Review was Conducted)
Start and Finish Time of Application (include AM or PM)
Pre or Post Emergence Application - if Post Emergence Notate How Many Days After Planting
Air Temperature at Boom Height at Start and Stop Times
Wind Speed and Direction at Boom Height at Start and Stop Time
Tank Mix Partners - Including all Non-Pesticide Products. If Other Pesticides are Included, Records Must Show EPA Regulation Numbers for Each Product
Spray System Cleanout Procedure. At a Minimum, Records Must Indicate Spray System Was Clean Before Application was Made and What Cleanout Procedure was Used. Date of Cleanout is Required
Furthermore, each state may go above and beyond the requirements listed here so be sure to check your local state regulations BEFORE applying RUP products.
If you enjoyed this read, please, feel free to share with family, friends, and/or associates. Be safe out there.
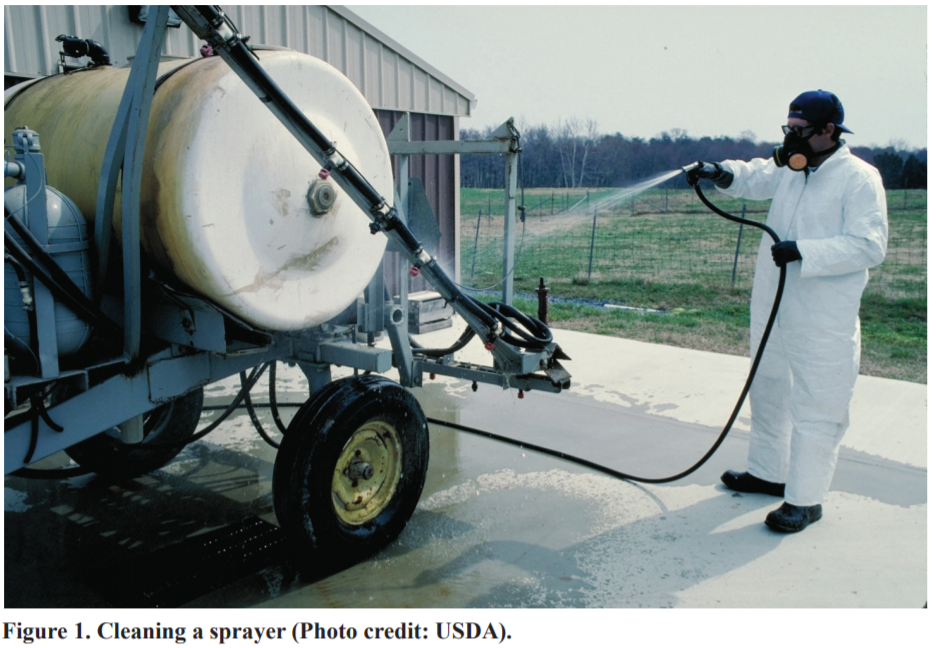
As winter approaches, it's essential to prepare your sprayer for the colder months ahead. Properly rinsing and winterizing your sprayer not only extends its lifespan but also ensures it will be ready for use when spring arrives. In this guide, we'll walk you through the necessary steps to rinse out your sprayer, protect key components, and prevent freeze damage.
Step-by-Step of How to Properly Winterize a Spray Unit
In order to begin you need to ensure that your entire system has been evacuated of the solution(s) you were spraying with the unit. That means you need to evacuate the pump housing, hoses, strainers, tank(s), spray wands, etc. Start at the tank and run through the entire plumbing system - no component of the system that comes in contact with liquid should be left out of this process. If something is neglected, odds are good that you will have issues when you go to start up next season. Let's avoid that at all costs. Here's how....
Rinsing Your Sprayer
Any system should be thoroughly flushed with clean water. Industry standards recommend a triple rinse. Add one-half tank of fresh water and flush all tanks, lines, booms, nozzles, wands, etc. for no less than fifteen minutes. Do this using a combination of agitation and spraying. Remember that rinsates(the solution you create while flushing your system) do contain residuals from your system. Therefore, any pesticides, herbicides, fungicides, etc. that you were spraying will be flushed from the system out of your orifice(s). Do not allow rinsates to flow into streams, rivers, ponds, lakes, floor drains, sewers, or sinks.
It's best practice to use containment pads such as these to collect rinsates and then apply them to labeled sites at or below labeled rates. If possible, consider rinsing the system at the application site. Furthermore, the product label should specify best rinse practices - always consult the product label. Lastly, proper protective clothing should be worn to avoid chemical contact with any exposed skin.
Remember, many of the chemicals out there are designed to kill living organisms - that means it's not good to get it into your bloodstream. If you do get any product on exposed skin make sure to wash the contaminated area with soap and water immediately, for no less than 15 minutes.
Flush Out Sprayer Components
This is also a good time to clean strainers of any debris that was picked up during the past season. By performing this task you will help ensure that you don't starve your pump and blow out seals when you start up next season. Here is another post on pump cavitation to further explain how detrimental this can be. Sloppy clean-up practices are a main cause of equipment failure or malfunctions. You're here to prevent that and avoid expensive downtime.
You can create a cleaning solution by doing the following:
Fill the tank with fresh water and the recommended cleaning solutions or tank cleaner.
Agitate this solution for no less than 15 minutes.
Add one of the following to 50 gallons of fresh water.
Two quarts of household ammonia (let sit in sprayer overnight for herbicides such as 2,4-D or Dicamba. It's recommended to consult your label for recommended cleaning agents*)
Or add four pounds of trisodium phosphate cleaner detergent. (It's recommended to consult your label for recommended cleaning agents*)
Operate spray booms or wands long enough to ensure all lines and orifices are filled with the cleaning solution.
Let the solution stand in the system for no less than three hours.
Agitate and spray the solution onto suitable areas for rinsate solution.
Add more fresh water and rinse the system again by using a combination of agitation and spraying.
Remove strainers, screens, regulators, etc. and clean in a separate bucket of your cleaning solution.
Rinse and flush the system again with fresh water.
Don't neglect the fact that, any product left in the plumbing system, that is allowed to dry, is much more difficult to remove and will eventually build up enough to plug lines and orifices. Plugged lines and orifices not only decrease the overall efficiency of your plumbing system, but will bring about a slough of other headaches. Always wash down the external portion of the spray unit at the wash site, as well. This helps to remove any external residue that the unit collected via spills or drift.
Making Sprayer & Sprayer Pump Repairs
Next, let's move on to the pump itself. Remove the pump from the drive unit - generally on most skid sprayers this will be a gas engine. It's always best practice to take the pump completely apart BEFORE you order repair parts. For instance, you may order a complete overhaul kit and find that you really only needed to replace some gaskets. We strongly recommend to get the pump opened up and thoroughly inspect it.
Once you have completed this and have drawn up your parts list - only then should you order repair components. We have an extensive parts breakdown file, to help you identify the correct parts you need. In order to use this resource you need to know the manufacturer, pump type, and model number. Click here for access to our Parts Resources. For additional resource videos see below.
Hypro 7560 roller pump Repair Video:
Hypro D403/AR403 Pump Repair Video:
Prep Sprayer For Storage
If you absolutely need to store your unit outdoors over the winter make sure to remove all hose and any polymer (plastic fittings, connections, etc.) Some companies recommend adding lightweight oil such as diesel fuel or kerosene to a system for off-season storage. We don't recommend this as oil-based products don't like EPDM elastomers. For this reason, we suggest using a 50/50 mix of RV antifreeze and water. We recommend this treatment for your entire plumbing system - whether you store your unit indoors or outdoors.
The reason we recommend this treatment is based on experience. We have had customers store units in temperature-controlled environments, during the off-season, only to have their heat source fail. This resulted in the pump housing cracking due to their own negligence. If they had charged the system with a solution that would not freeze they could have avoided an expensive surprise come spring.
Here is another post on chemical compatibility and how it's worthwhile to perform due diligence. Run this solution throughout the entire plumbing system for a minute or two in order to ensure that your total system is winterized and safe from freezing.
It's also recommended to remove all gauges and store them indoors if possible. Change out your oil if you are running a diaphragm pump unit - this ensures you are ready to rock-n-roll come go-time next spring. Remember, the main reason for failure or malfunction in any spray system is neglect and improper maintenance. Lastly, make sure to replace air/oil filters on your gas engine. Don't forget to add a fuel stabilizer treatment to your engine and run it for a few minutes to ensure the treatment reaches all internals of the engine.
Before You Go
If you can ensure following these steps in your post-season shutdown process we know you will be in much better shape come next season. All of your equipment should be good to go and ready when you - and more importantly - your customers need it to be. Thanks for stopping by and have a great off-season.
Sources:
Some of the information in this post was found through The University of Nebraska-Lincoln the Cleaning Pesticide Application Equipment publication from August 2013.
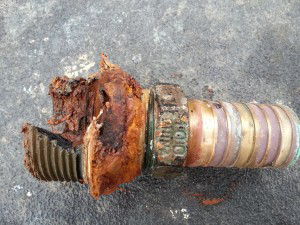
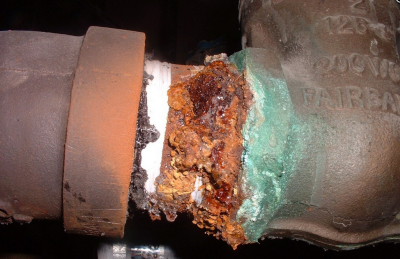
Have you ever encountered a nightmare situation where a hose miraculously turns into an icky, nasty, pasty goop? Or how about a pump that starts leaking from virtually every connection point and fitting? What about a fitting that has a pinhole worn through it after only a few days in service? These are all scenarios we have witnessed and can help prevent. Here's how we are going to get you set up with correctly identifying chemical-compatible products and solutions from the get-go.
Importance of Ensuring the Chemical Compatibility Between Solutions and Product Material Used
It is extremely important when working with any variety of chemicals or solutions that pumps, hoses, fittings and safety items are correctly matched for chemical compatibility. Most manufacturers offer chemical resistance charts for their specific product lines and are readily accessible when required. Check out a thorough chemical compatibility chart from Dura Products in our Resources Library. And if that chart isn't enough here is another resource for you. For the safety of you and your employees, it is critical that a proper analysis is made between the solutions you will be handling and the products used to transfer those solutions.
Product Warranty Issues
Also, most manufacturers will not warranty products for compatibility issues if an analysis was not properly completed - prior to product use. If it is concluded that a specific chemical compatibility issue caused a product to fail or perform there will be, in most scenarios, no warranty granted by the manufacturer. Failure to perform a proper chemical compatibility check prior to solution handling could result in catastrophic failure of your equipment and extensive unnecessary costs due to downtime and repair/replacement of equipment and components.
Common Incompatibility Issues between Product Material and Solutions based on our Experience
We have seen EPDM hoses turn to mush when used to transfer oil-based products. Similarly, we have witnessed pump elastomers (seals, O-rings, gaskets) completely deteriorate and create an environment where metal is creating friction against metal inside of pumps. Without elastomers inside a pump, it cannot function properly. Furthermore, we have seen PVC fittings completely deteriorate after only one to two weeks in service.
All of these scenarios could have been avoided had the operators approached us beforehand and identified the solutions to be transferred with their initial choices of products. Should you ever have questions about chemical compatibility - don't hesitate to contact us - that's what we are here for.
Common construction materials for pump bodies and housings are Polypropylene, Stainless Steel, Cast Iron, Kynar (PDFV), Brass, Bronze and Aluminum. Materials generally used in constructing pump seals are Viton, EPDM, Buna, Hytrel, Teflon and Santoprene. Common construction materials for fittings and accessories, such as strainers and valves, include Polypropylene, Nylon, Brass, Stainless, Cast Iron and Acetal.
Hoses and tubing are generally constructed of Buna, EPDM, Viton, Teflon, PVC, EVA, Polyethylene or Neoprene. That being said, your specific application could call for a unique material to be used - given the parameters of the solution you are transferring.
Next Steps - Identifying Suitable Product based on Solution
Once we have identified the solution we are transferring we can then determine what products are suitable for the transfer of that solution. Here at Dultmeier Sales we don't guess - we want to do as much as possible to ensure chemical compatibility from the start. If there are ever questions as to what a solution consists of - you should acquire an SDS or Safety Data Sheet. This document was formally known as an MSDS (Material Safety Data Sheet).
By acquiring an SDS we are able to see the highest concentration of a substance in a percentage breakdown. It is always best practice to find a product that can safely handle all substances that make up a solution. That being said, that is not possible in every scenario. In those instances, one should identify the top substance(s) and locate a product that is chemically compatible. Safety items such as gloves, aprons, boot covers, and arm covers are commonly offered in Neoprene, Nitrile, Latex, PVC.
The first step for proper handling and transfer is to check both the body and the seals of your pumps for compatibility against any number of chemicals. Remember to consult the SDS of the product(s) you are handling. The pump body may be rated to handle a specific chemical but the seals may not. Also, valves and diaphragms need to be reviewed as does any material that will come in contact with a specific chemical or solution.
If we don't perform this step our operation will most assuredly come to an inevitable halt - due to failure to properly identify chemical compatibility. Another note to be aware of is that if you choose to mix multiple chemicals and transfer with one pump - we cannot definitively say what chemical reactions will take place with your elastomers, hoses, fittings, etc.
When you mix multiple chemicals together you have just altered the chemical makeup of the solution. We recommend avoiding this scenario unless you are certain the products you are mixing are like products.
If the pump construction is compatible, next check against fittings and hose that will be used in the application. We cannot stress this enough - always check compatibility with any and all items that will come in contact with the chemical or solution. As a general rule Kynar and Teflon are used for very aggressive solutions but are at the high end of the cost spectrum.
There are some more economical options in EPDM, Viton, and Buna. EPDM and Viton may work fine for soaps, waxes, and some herbicides and/or pesticides. Do note that Buna is not suitable for many agricultural chemicals, but is compatible with petroleum-based solutions. While EPDM is compatible with many chemicals, it is not suitable for oil-based products - stick with Viton or Buna in those scenarios.
Key Parameters to Consider: Temperature & Pressure
Furthermore, it is important to confirm temperature and pressure as these two variables can also affect compatibility. Temperature and pressure should always be taken into consideration as they can vary with every application or between applications. For instance, a chemical may respond differently to changes or fluctuations in either temperature and/or pressure.
The fluctuations may actually cause the chemical to completely alter its structure and no longer be compatible with elastomers or products that were previously identified as chemically compatible. Long story short, you may be fine transferring and handling a product at ambient temperatures but may find an issue at higher temperatures or pressures.
Remember to check for compatibility with all of the item groups above. Any chemicals or solutions that you may be handling or transferring should always be confirmed with an SDS - if chemical compatibility is in question. Think chemical compatibility first for the safety and protection of yourself and others. Furthermore, we want to ensure greater longevity and performance of your pumps, valves, fittings, and hoses. Request a Free Catalog here.
If you enjoyed this post check out our technical library for more resources. Can't find what you're looking for? Give us a buzz or drop by our website. Be safe out there.
Hypro-Shurflo is actually a subsidiary of Pentair. Pentair is a parent company that delivers industry-leading products and solutions all over the world, specifically in the liquid handling, thermal management, and equipment protection industries. The Hypro name has been known and trusted for the last 65 years.
That being said Hypro has a product mix that is focused on higher end capacity flow applications. Hypro was also the first company to come out with piston pumps originally used in the carwash industry. The old dinosaur pumps of the early 1970s have evolved into the plunger and piston pumps of today's market. Hypro is also largely relevant within the Agricultural industry. Sprayer pumps, transfer pumps, spray nozzles, strainers, fittings, and much more can all be found with the Hypro name stamped on them.
Recently, Hypro has come out with their ForceField pumps to help combat seal failure in centrifugal sprayer pumps. It is designed with the mindset of a maintenance-free wet seal chamber. The wet seal chamber is self-regulating and does not require the operator to monitor the pressure to ensure the pump seal is constantly engulfed in the lubricating fluid. Hypro boasts the self-regulating and monitor-free design over competitors such as Ace Pumps and their Oasis wet seal design.
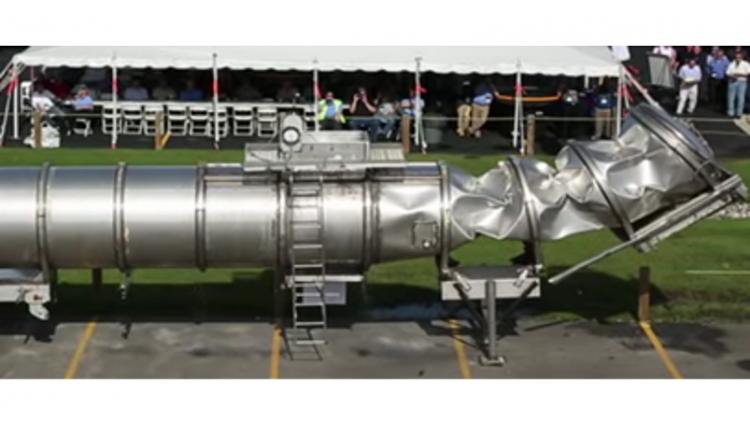
One must always keep in mind that it is extremely crucial to have proper ventilation - IN ANY tank that holds liquid. A tank vent may seem like a small component of the system, but it is absolutely necessary. If there is a pump attached to the tank and that pump is drawing suction from said tank, it is imperative to properly vent the tank.
Without proper ventilation one can turn a rail car - as seen in the video above - into a pop can. Do note, that tank above is a standard liquid transport rail car and weighs approximately 68,000lbs (34 tons) with a minimum wall thickness of 7/16IN plated steel. Bottom line - make sure you have a tank vent installed in any tank you use.
Even in the smallest of tank applications, it is absolutely prudent to install a vent in every tank. We have seen many applications over the years where a turf applicator, using a small 50-100 gallon tank, did not properly vent their tank and collapsed the sidewalls by using a small transfer pump. A vacuum can be created rather quickly in many plumbing situations.
Another example is commonly found in the retail fertilizer industry. Many companies will pull from 275 gallon cage totes with concentrated chemical and dispense into smaller containers or mix with other products. If these polyethylene tanks do not have a tank vent and are, therefore, not vented properly, they too will collapse.
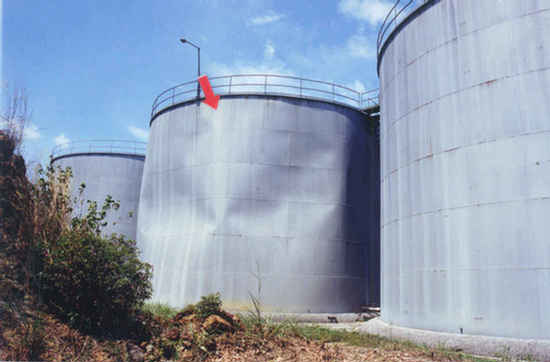
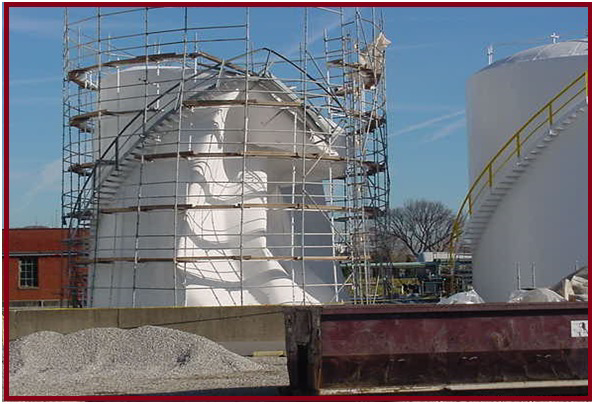
This does not only happen in transfer tank scenarios. There are many applications in which actual bulk storage tanks have collapsed due to the creation of a vacuum in the plumbing system. When a pump is starved of liquid, it will begin to cavitate. We will have a future post on what pump cavitation is and how to avoid it. In larger bulk tank storage scenarios we have seen tank vents become clogged up with dirt, debris, bugs, etc. This happens from simply being exposed to the environment. The inspection of ALL tank vents should be written into any annual or bi-annual safety inspection protocol.
With ever-increasing OSHA regulations, this task could be difficult to accomplish without repercussions. OSHA does not want employees on top of storage or transfer tanks for obvious safety reasons. Should they find a company employee on top of tanks, potential fines could be imposed. That being said, if no one is inspecting tank vents how do we prevent tank collapses from happening more often?
Below are a couple of images of bulk tanks that were sucked in or "collapsed" due to pump cavitation. The cavitation was so great that it essentially created a full vacuum and collapsed the tank walls. A tank collapses because a complete vacuum has been created in the plumbing system and, due to the tank having the largest surface area, it is generally one of the weaker points in the plumbing system; relatively speaking.
A vacuum is the absence of pressure. If there is no pressure internally, there is no force to combat atmospheric pressure. There is and always will be a constant force (atmospheric pressure) acting on the exterior of the tank walls. Atmospheric pressure is 14.7 pounds per square inch. When a full vacuum is created there is no internal pressure in the tank to combat atmospheric pressure (external force) and the result is evident in the video above.
In smaller applications, such as a spot sprayer or small acreage spray unit, a basic vented lid cap can be used to avoid tank collapse. Do note, that the user will see some slosh or spillage come out of the vent. This is normal as the vent is doing what it is intended to do - allowing the tank to exhaust internal pressure and "breathe". Even in small tank applications like this spot sprayer, it's critical to have a vent. Many solutions will tend to vaporize as they warm up. This causes an expansion due to added volume that the vapor creates. Without a vent, an end user will notice a swelling in even the smallest of tanks.
Many smaller vent caps are simplistic and just have an internal spring. The spring acts as a relief valve and exhausts the pressure in the tank. Furthermore, the vent allows air to enter the tank, as well - it's a bidirectional valve.
Therefore, when pressure builds in the tank - due to product heating up, expanding, or vaporizing - the tank valve allows that pressure to be released or exhausted. Thus, a vent can work in two different ways.
First, it helps a tank from collapsing in on itself if a vacuum is created in the plumbing system. As seen in large tank pictures above, we can do the same thing to smaller tanks if we create a vacuum in the plumbing system. Secondly, the vent allows a tank to breath outward if the liquid inside the tank begins to vaporize - when a liquid vaporizes and turns into a gas it actually takes up more space. This can be seen with a small plastic gas tank if left out in the sun. While a tank can collapse inward it can also rupture outward.
The bottom line, key takeaway from this discussion topic - always use a tank vent valve to ensure that your tank remains in service and you don't have a major mess on your hands. If you have further questions don't hesitate to give us a shout. Your Experts in Delivering Fluid Handling Solutions - We Know Flow!
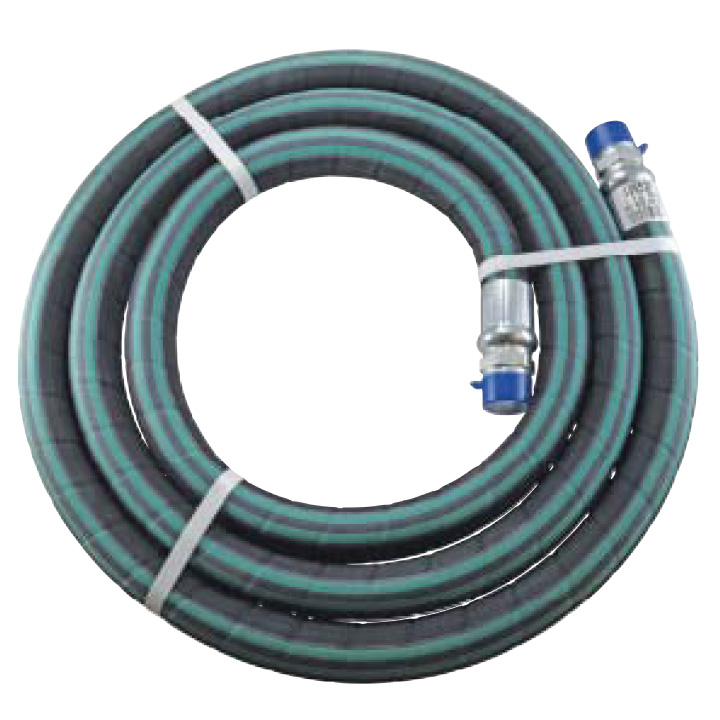
The fall/spring application of the fertilizer Anhydrous Ammonia, also known as NH3, is always a hectic time for those in the agricultural industry. The race to get the precious fertilizer in the ground is fast-paced and everyone is running like gangbusters. Every season fall/spring we field phone calls that stem from concern due to the reliability and service of ammonia hoses.
This post should clear up many questions and will provide some valuable education to you and your team. Below you will find a listing of common questions we run across throughout a season. As always, we are happy to help share our wealth of technical knowledge and experience.
Common Anhydrous (NH3) Hose Questions
Residue on NH3 Hose Exteriors
Question: At times a residue forms rings or cones all over the cover of my anhydrous ammonia hose. This residue resembles or looks like white spots.
What causes this residue to appear and what is it?
Answer: Anhydrous ammonia hoses are designed to allow a small amount of gas through the wall of the hose. This is known as pinpricking and it is a safety requirement. This allows trace amounts of NH3, to permeate through the tube. The pinpricks allow minute amounts of anhydrous ammonia to easily escape into the atmosphere through the hose cover. There is such a trace amount of anhydrous ammonia being released that it is not harmful.
A hose that has been improperly pricked will cause the cover to blister and eventually blow out - this is the same for a hose that has not been pricked at all. A hose blows out when NH3 becomes trapped between the layers in the hose, heats up, and vaporizes - thus causing rapid expansion and bursting through the hose cover.
The single drawback to pin pricking is the residue that is left on the hose and the resulting appearance that the hose is somehow defective, after use. Remember, as the anhydrous ammonia escapes through the pinpricks it comes in contact with the atmosphere and forms the white residue that many operators commonly see throughout the season. The color and consistency of the residue are affected by the amount of dust and relative humidity present in the atmosphere.
This residue does not indicate a defective hose and in no way should be viewed as a problem or unsafe situation for operators. Furthermore, it is a reminder of this built-in safety feature of the anhydrous ammonia hose and that it is, in fact, working as intended.
NH3 Hose Basketing
Question: My stainless steel braided anhydrous ammonia hose has ballooned out behind the coupling.
Why is this happening?
Answer: The symptom described above is referred to as "basketing". Basketing is the result of the thermal expansion of trapped anhydrous ammonia in the hose. By design, the hose is intended to expand in a controlled fashion when this over-pressurization occurs. Most commonly, a user will see basketing form behind the coupling - this intended consequence is meant to keep the NH3 hose from a catastrophic blowout.
Thermal expansion generally occurs when anhydrous ammonia remains or leaks out of a shut-in hose assembly and is allowed to heat up or "cook" in the sun. Extremely high pressures occur, internally, as the black hose is exposed to sunlight for extended periods.
It is highly recommended that all hose assemblies be emptied before storage and downstream valves are checked for compliance and acceptable operation regularly. Furthermore, hydrostatic relief valves should also be checked for correct operation and compliance pressures depending on state and local fire marshal requirements.
Anhydrous Ammonia Expected Service Life
Question: What is the expected service life of an anhydrous ammonia hose?
Answer: Factory-assembled NH3 hose assemblies come in three variations that each have a different service life. Each type is labeled with a removal date. Here is the life span for the different ammonia hose assemblies that we carry at Dultmeier:
Goodall New Hose Expected Service Life - When Coupled by Authorized Goodall Locations:
Recommended Anhydrous Ammonia hose maintenance and care instructions:
New Hose
Ensure you have the correct hose. All Anhydrous Ammonia (NH3) hose will be strip branded, stating that the hose is for Anhydrous Ammonia, the working pressure, the name of the manufacturer, and the month and year the hose was made.
Make sure the couplings are properly put on. After the hose is charged with anhydrous ammonia, check that the couplings are secure and that they have not moved.
Ensure that the new hose is free from cuts, gouges, and imperfections. Perform a visual check of each hose in service. Run your hand down the length of the anhydrous ammonia hose, checking for soft spots.
Never secure the coupling in a vise when attaching valves.
Goodall highly recommends that all relief valves be replaced at the same time a new hose is installed.
If any of the above imperfections are found to be existent, remove the hose from service immediately.
Used Hose
An anhydrous ammonia hose that is currently in service or has been carried over from the previous year:
Applicators should remove anhydrous ammonia hoses from the nurse tank(s) before winter and store in a cool, dry place. Keep away from direct heat and any motors that are operating. The best place to store an anhydrous ammonia hose is to hang the hose in a vertical position from the shoulder of the coupling. By doing this one relieves stress on the hose. The hose will be out of the way so as not to be damaged by individuals walking on it, trucks driving over it, or anything being piled on top of it. Furthermore, the storage of anhydrous ammonia hoses indoors prevents damaging UV rays from the sun ruining the hose.
NH3 hoses should be checked in the spring in the same manner as a new hose is inspected - this way the user ensures that an Anhydrous Ammonia hose is, in fact, an Anhydrous Ammonia hose.
Each hose should be checked at least daily, if not each time the hose is used, to ensure proper function. Make sure to check for movement of couplings, cuts, gouges, or cracks in the cover. Check for any soft spots - this is done by running your hand down the entire length of the hose.
Should any of the above imperfections in an anhydrous ammonia hose be found, immediately remove the hose from service.
Always remember - visual and manual inspections SHOULD BE DONE DAILY.
Don't hesitate to contact us should you have any questions. Be safe out there...
A common misconception with any pump, for that matter, is that the flow rating of the pump is the output that a user will see - regardless of the plumbing system that the pump is installed into. For further explanation check out one of our previous blog posts about centrifugal pump sizing, applications and how a plumbing system affects pumps differently.
While most 12 Volt fuel pumps are not centrifugal pumps the flow rates of these pumps is still drastically affected by the plumbing systems in which they are introduced into. Think of it this way - while your car speedometer maxes out at 160 mph you certainly can't drive the vehicle that fast - at least for an extended period of time without catastrophic failure. A pump is very much the same - while it may be rated to 25 gallons per minute (GPM) that doesn't mean that you will see flow rates equivalent to that output.
One solution to decrease filling times is to evaluate your plumbing system. Do you have 3/4IN lines? Can you bump up to 1IN? Remember, the greatest thing we can do in order to increase the efficiency of our plumbing system is to increase the size of the plumbing system. How about a high flow fuel nozzle?
If we simply have a standard flow nozzle that will certainly affect your flow rates in a negative manner. Keep in mind that many 12 Volt transfer fuel pumps from manufacturers such as Fill-Rite or GPI are rated 20-25 gpm. Now if you have nozzle at the end of your plumbing system that is rated only to 20 gpm don't think that your 25 gpm pump is going to achieve that flow rate. You have just capped your flow rate at 20 gpm with the limiting factor being the nozzle.
Should you have a 3/4IN line you will see an even greater reduction in flow rates - again the greatest thing one can do to increase the efficiency of a plumbing system is increase the size of the plumbing. Another major plumbing constraint to be aware of is the filter. Ensure your plumbing system has a high flow capacity filter such as Cimtek's CI1000.
What can one do to drastically reduce filling time in the field or at the farmstead? Invest in a high flow transfer unit such as our DUFPU1.5P. This unit has been tested to 60 gpm. Check out another blog post dedicated to this unit here. This can cut your fill times by 1/3 of the time it takes to fill using a standard 12 Volt pump or gravity feed elevated tank.
Simple fact - that means less downtime for you and more time in the field - ultimately equating to greater profitability. For those wanting a simplistic engine driven diesel fuel transfer pump check out these 5.5HP - 11HP options. Remember we can go slightly lighter on the horsepower requirements when pumping a material such as diesel fuel.
This is due to the fact that diesel fuel actually has a lighter specific gravity than water (8.34 lbs/gal) and, therefore, we can use less horsepower to achieve the desired flow rates. We will have a blog post on specific gravity and how that correlates to product flow rates at a later date. Stay tuned...